1.Before starting your experiment - test the airtightness of your sampling pump! -
- 1.
- Insert a detector tube (with both tips intact) into the tube inlet of the sampling pump.
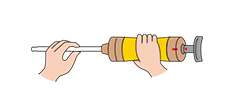
- 2.
- With the handle fully pushed in, align both of the guide marks (red line + triangle) on the pump and the handle.
- 3.
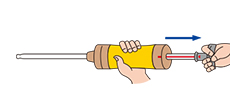
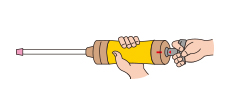
- Pull out the handle in one motion until it is locked, and then remove your hand (from the handle). Wait until the sampling time (approx., 30 seconds) has elapsed.
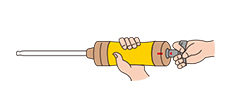
- 4.
-
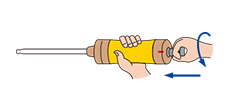
Grasp the handle and turn it 90 degrees.
If the handle readily returns to the original position (2), the pump (with the attached tube) is completely airtight.*If the handle does NOT return to the original position and remains 5mm. (or more) away from it, the pump is NOT airtight and measurements would NOT yield correct results! (See the section about Repair and Maintenance in the instruction manual).
Video instruction
2.Measuring
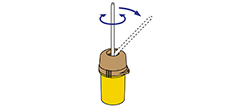
- 1.
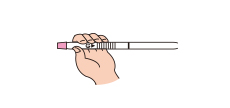
- Insert a detector tube tip to the tip holder. Turn the detector tube and make a scratch with the file in the tip holder. Snap the detector tube and cut off the tip of the detector tube.
- 2.
- Then slip the sleeve-like rubber inlet cover over the top of the pump (the end of the pump with the arrow [G⇒]). For detector tubes 2EL, 2EH the mark is red; for tube 31E it is blue.
- 3.
- Insert the selected detector tube into the rubber inlet of the pump with the arrow (G⇒) on the tube pointing towards the pump.
- 4.
- With the handle fully pushed in, align both of the guide marks (red line + triangle) on the pump and the handle.
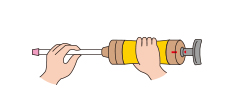
- 5.
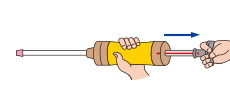
- Pull the pump handle in one swift motion, carefully let go of the handle and point the tube towards the target area and simply wait for one minute!
- 6.
-
Turn the handle 90 degrees and carefully let go; it should remain in place (without going back.).
*Otherwise, repeat the procedure (of pulling out the handle) in point 5. and wait about 10 seconds; It should now remain in place without going back.).
- 7.
-
To check the colour change, refer to Tips for detector tube reading (below)
- 8.
- Remove the rubber inlet cover as it can be reused. Collect all used/broken detector tubes and dispose of them properly.
- 9.
- Carefully push the pump handle back in.
Tips for detector tube reading:
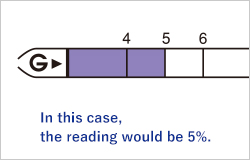
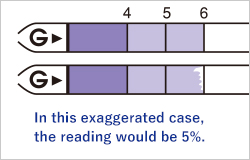
When the end of the colour change layer is flat, simply read the value at the end.
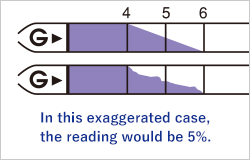
When the end of the colour change layer is slanted, read the value in the middle of the slant.
When the demarcation of the colour change layer is pale, the mean value between the dark and the pale layer ends is taken.
TIP FOR EASIER READING
It is convenient to mark the colour change with a pen as soon as finishing the sampling.
Video instruction
Product search
-
Detector tube Search
-
Search other products
-
Product search